Maintenance: Rear swaybar endlink bracket replacement
The rear swaybar endlink suspension bracket broke off. I'm
not sure how many people this has happened to, I wouldn't be surprised if there
were more. Looking at the bracket itself, the metal is relatively thin, but
then again, so is the endlink itself. I've heard of a few people snapping the
endlinks. Most will probably not need this diy guide, but since I have the pics,
I'll go ahead and post this up.
Tools needed: Ratchet set, hex (allen) set.
Step1: Jack up the rear of the vehicle and place it on jack
stands. Place the wheels in front of the jack stands under the car for added
safety.
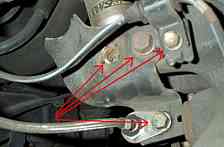
=Description= There is 4 bolts attached to or attaching the bracket
to the wheel hub:
Bottom shock bolt
Bolt securing the bracket to the wheel hub
Wheel sensor wire
Brake hose bracket
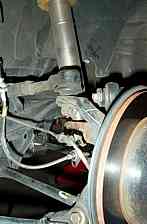
Step3: Unbolt the bottom shock bolt first. You don't need to
completely remove the bolt, just enough to unthread it from the bracket. This
will save you some headache of trying to realign the hole from the shock to the
hole on the wheel hub.
Step4: Unbolt the other 3 bolts and remove the bracket.

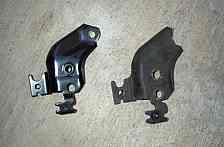
=Comparison Pic=
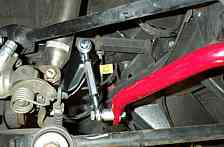
Step6: Reinstall the new bracket.
=Torque specs=
Bottom shock bolt - 43 ft. lbs.
Bracket to hub - 35 ft. lbs.
Wheel sensor wire - light. 9 ft. lbs
Brake hose bracket - light. 9 ft. lbs.
Endlink to bracket - 28 ft. lbs.
-Finished Pic-
>>> Home


