HID Projector Retrofit DYI Instructions

Parts needed: HID Projectors (http://faq.auto.light.tripod.com/car-oem-hid.htm is a great site for info on oem hids that you may be interested in), Aluminum sheeting, 8-32 x 2" screws and nuts, washers, 8-32 wing nuts, 1/4" x 1" x .035 springs, '96-'00 Civic lightbulb rubber ring seal, JB weld, sealant (clear or whichever color you prefer).
Tools needed: Sheet cutters, rotary saw (Rotozip, Dremel, etc.), Drill, screwdrivers (phillips and flat), pliers, safety glasses, face dust mask
Step 1: Remove the headlights from the car and disassemble it. (For instructions on removing and disassembling headlights click here)
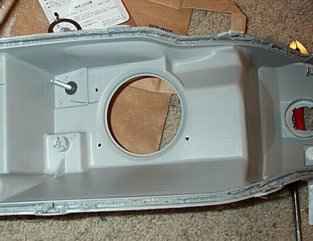
Step 2: (*Note: It's recommended that you use latex gloves for the following procedure. The reflective paint on the reflectors are delicate so you don't want to end up scrubbing it trying to take the oil off from your fingers). Remove the reflector from the back headlight casing. There are two screws and one ball socket holding the reflector in place. The adjustment knobs are controlling the screws, turn them to get the reflectors off. Afterwards, pull the reflector off the ball socket.

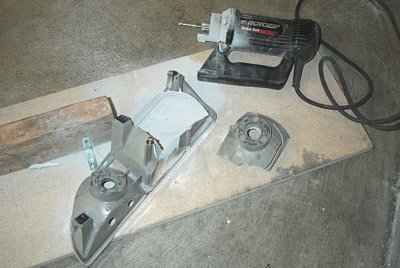
Step 3: (*Note: Safety - I forgot what the material the reflectors are made of, but when you cut them with the spiral saw, they create a very fine dust that can irritate your respiratory system. I STRONGLY suggest you use a dust mask and some safety glasses to prevent the dust from getting in your eyes and lungs)
You'll need the sprial saw (Rotozip, Dremel) to cut the low beam reflector in order to make room for the projector housing. Cut the hole as big as you can extending from the adjustment screw/ball socket to the level guage. Make sure you cut the top too so that it's flat and not curved.
Step 4: Test fit the reflector with the projector and the headlight casing to make sure the projectors won't hit the reflectors. Once you are satisfied with the cut, gently wash the dust off under running water with your gloved hands. Gently wipe dry using a SOFT cotton towel and put it aside. That's one part of the project.
Step 5: Take the back portion of the headlight casing and the projector to determine the best location of the projector (centering the projector in the middle of the hole). Once you've attained the desired location, make sure that the projector is aligned horizontally straight. You don't want the beam pattern shooting at a slant. Now mark the holes for drilling.
Step 6: Select the appropriate drill bit (I forgot which size I used), the drill bit should drill a hole so that the screw has just enough clearance to slide through. Don't make it too big.